独热码

独热编码

tf.one_hot(待转换数据,depth=及分类)

1
2
3
4
classes = 3
labels = tf.constant([1,0,2]) # 输入元素最小为0,最大为2
output=tf.one_hot(labels,depth=classes)
ptint(output())

独热码转符合概率分布

公式:

Softmax(yi)=eyiΣj=0neyi\mathrm{Softmax}(y_i)=\frac{\mathrm{e}^{y_i}}{\Sigma_{j=0}^n\mathrm{e}^{y_i}}

Tensorflow随机生成数

Tensorflow随机生成数

1
2
3
tf.random.normal(维度,mean=均值,stddev=标准差) # 生成正态分布随机数,默认均值为0,标准差为1

tf.random.truncated_normal(维度,mean=均值,stdevv=标准差) # 生成截断式正态分布的随机数

正态分布取值规则 在tf.truncated_normal中如果随机生成数据取值在(μ-2σ,μ-2σ)之外,则会重新生成

μ:均值 σ:标准差

标准差计算公式:

σ=i=1n(xix)2n\sigma=\sqrt{\frac{\sum_{i=1}^n(x_i-\overline{x})^2}n}

1
tf.random.uniform(维度,minval=最小值,maxval=最大值)  # 平均分布生成张量

Tensor

Tensorflow常见数据类型

Tensor(张量):多维数组

数据类型

1
2
3
4
5
6
# tfint, tf.float ...
tf.int 32,tf.float 32,tf.float 64
# tf.bool
tf.constant([True, False])
# tf.string
tf.constant(“Hello, world!”)

如何创建一个Tensor

使用关键字constant
1
tensorflow.constant(数据,dtype=数据类型(可选))
1
2
3
4
5
6
7
8
9
import tensorflow as tf
tf.constant([1,5],dtype=tf.int64) #创建一个张量
print(a)
print(a.type)
print(a.shape)
结果:
<tf.Tensor([1,5]),shape=(2,),dtype=int64)>
<dtype:'int64'>
(2,)

shape=(行数,列数)

创建Tensor
1
2
3
4
5
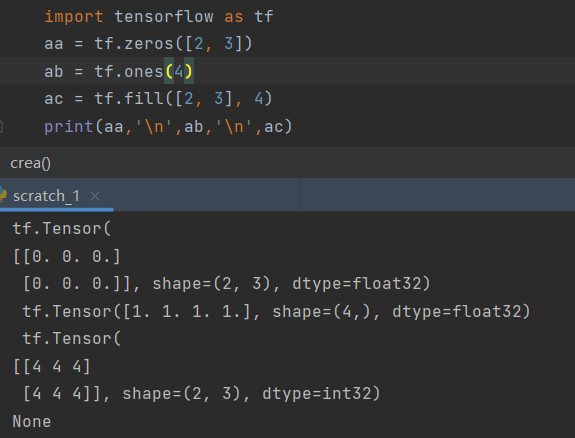
import tensorflow as tf
tf.zeros(维度) # 全为零的张量
tf.ones(维度) # 全为一的张量
tf.fill(维度,指定值) # 全为指定值的张量
print(aa,'\n',ab,'\n',ac)

超参数

学习率(参数更新)

lr学习率

ωt:t时刻网络的参数

wt+1=wtlrlosswtw_{t+1}=w_{t}-lr*\frac{\partial loss}{\partial w_{t}}

Tensorflow环境配置

Tensorflow 环境配置

环境配置

Python环境为3.7 ,最新版本不适配

使用anaconda,安装时添加至系统path

  1. 使用Anconada Prompt 输入conda create -n TF2.1 python=3.7创建环境

  2. 接着输入conda activate TF2.1 进入环境

  3. 若是NVDIA显卡 可使用conda install cudatoolkit=10.1 和conda install cudnn 安装 显卡加速 和 英伟达深度学习包

  4. 最后使用pip install tensorflow==2.1 安装tensorflow(若下载慢可加上-i https://pypi.tuna.tsinghua.edu.cn/simple 镜像)

  5. 验证安装是否成功,紧接着输入python

  6. 输入import tensorflow as tf ,输入

    1
    print(tf.__version__)

    若出现‘’2.1.0“则安装成功

  7. 配置pycharm集成式开发环境创建新项目使用刚配置的anconda环境

  8. 在此项目内运行一下代码后

    1
    2
    3
    4
    5
    6
    7
    8
    9
    10
    11
    12
    import tensorflow as tf

    tensorflow_version = tf.__version__
    gpu_available = tf.test.is_gpu_available()

    print("tensorflow version:", tensorflow_version, "\tGPU available:", gpu_available)

    a = tf.constant([1.0, 2.0], name="a")
    b = tf.constant([1.0, 2.0], name="b")
    result = tf.add(a, b, name="add")
    print(result)

    结果为则开发环境安装成功

Python常用第三方库国内镜像

Python常用第三方库国内镜像

使用教程

1
pip install tensorlow==X.X.X -i 镜像名
1
2
3
4
5
6
7
8
注意:清华大学的Pytorch镜像为cpu版本!!

清华大学:https://pypi.tuna.tsinghua.edu.cn/simple/
阿里云:http://mirrors.aliyun.com/pypi/simple/
中国科技大学:https://pypi.mirrors.ustc.edu.cn/simple/
华中科技大学:http://pypi.hustunique.com/simple/
上海交通大学:https://mirror.sjtu.edu.cn/pypi/web/simple/
豆瓣:http://pypi.douban.com/simple/

损失函数

损失函数

MSE

损失函数(loss function) : 预测值(y) 与标准答案(y_)的差距
损失函数可以定量判断W、b的优劣,当损失函数输出最小时,参数W、b会出现最优值。

MSE(y,y)=k=0n(yy)2n\mathrm{MSE}(y,y_{-})=\frac{\sum_{k=0}^{n}(y-y_{-})^{2}}{n}

梯度

梯度

losswt\frac{\partial loss}{\partial w_{t}}

梯度——二维函数变化最快的方向

梯度是一个矢量

梯度越大,变化率越大

梯度下降算法

C语言环境准备(VScode)

C语言环境准备(VScode)

1.VScode C编译环境

  • 下载mingw c语言编译器
  • 配置mingw bin 环境变量
  • VScode安装code runner 插件
  • VScode安装 C/C++扩展
  • 在终端中运行 ctrl + , 输入 run in terminal勾选whether run in terminal 这样就可以正常编译了

2.VScode 创建C/C++ 项目

  • 需要配合插件C/C++ Generator
  • 使用快捷键 ctrl + shift + p 选择
  • 选择Create C/C++ Project